

Hello high carb day!
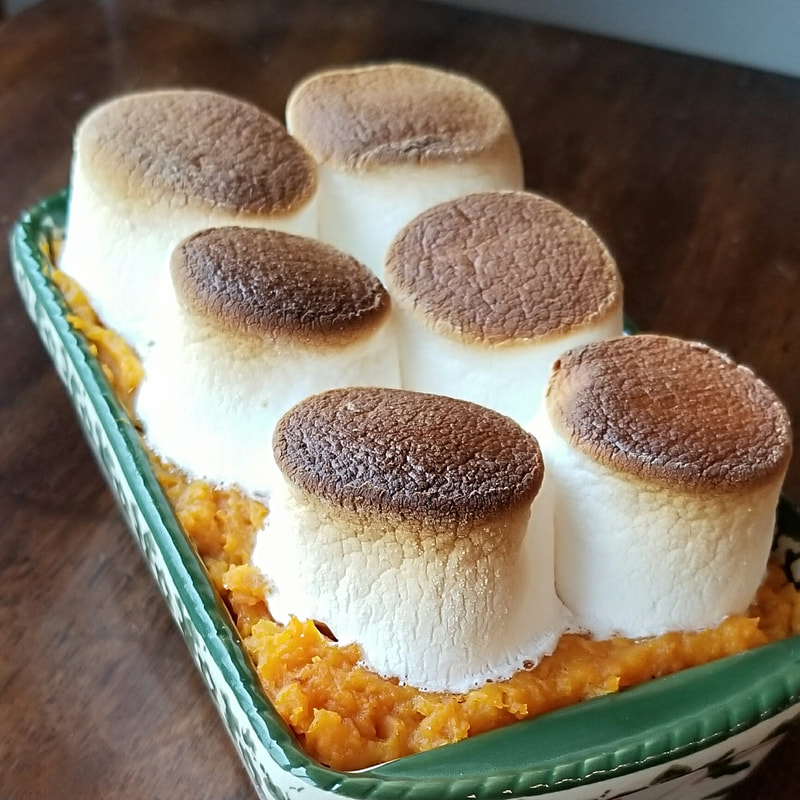
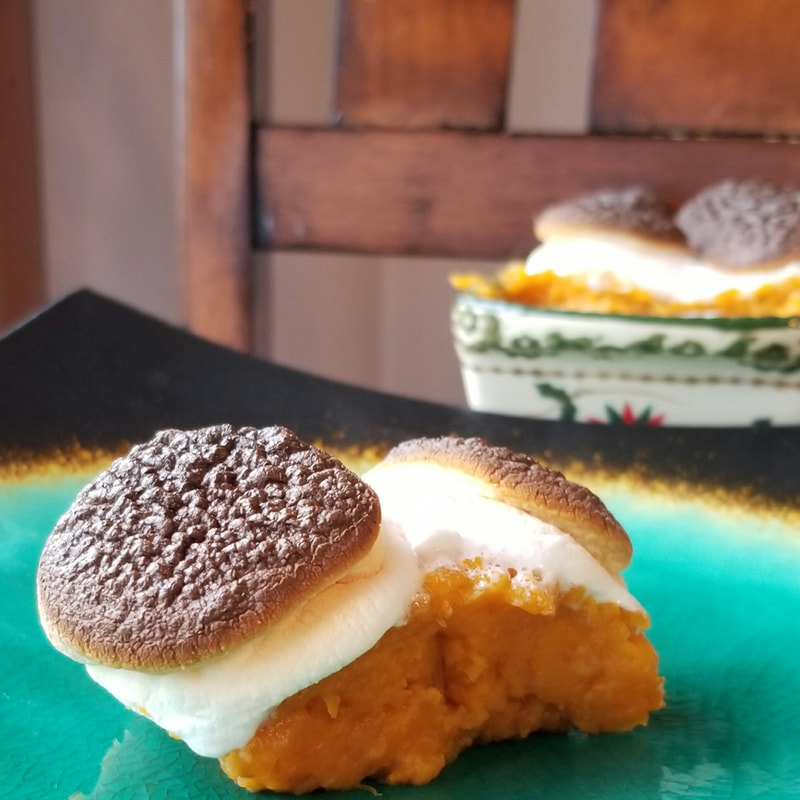
Well, I've really outdone myself this time, you guys. I think we all reserve all things Yams/ Sweet Potatoes for Christmas and Thanksgiving, but don't give them much more thought beyond that. I was craving Candied Yams in a huge way and I LOOOOVVVEEE sweet potatoes, but didn't want to have to make a big tray because I knew it'd go uneaten and I can't stand to waste food, thus my Single Portion Candied Yams recipe was born. (Yes, I know yams and sweet potatoes aren't the same thing, but it's my recipe, so that's what I'm calling these. HAHAHA.) These do take some time and depending on heat sources, you will need to watch/ check on them at certain stages, but the good news is, they are great for meal prepping and require very few ingredients. Make these in large batches and refrigerate as many as you need for the week. Then, when you're ready to eat them or prepare them for your lunch that day, all you have to do is throw your Single Portion Candied Yams in the oven, top with marshmallows and broil for a couple of minutes. My grandma gave me the cutest little Temp-tations mini loaf pans for Christmas and I'm not a huge bread maker, nor am I fond of their lack of design selection, but they ended up working out perfectly for my Single Portion Candied Yams! The Temp-tations brand can be really pricey and I'm a big fan of Wilton products so I suggest these affordable mini loaf pans I found on Amazon. Since they are the same size, the macronutrients {listed at the bottom of this page} will be the same. 
Let's get to making these Single Portion Candied Yams, shall we?
What you'll need: Ingredients:
Instructions:
Skin your sweet potato, cut it in half and put your sweet potato in a stovetop save pan. Fill with water to cover half to 3/4 of the sweet potato halves. Cover and boil on high until your sweet potato is "mushy" and you can mash it, similar to a mashed potato, but don't mash it yet! Once your sweet potato is mushy, drain the water and place your cinnamon and butter in the pan with the sweet potato and return it to the stove top on low heat to melt the butter, mashing and stirring the sweet potato to blend with the butter and cinnamon the whole time. Once the butter is fully melted... 
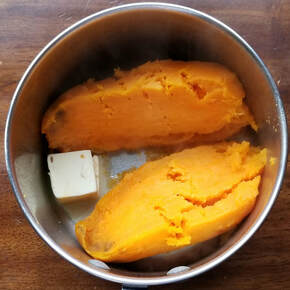
Pour your mixture into your mini loaf pan...
Top your mixture with your marshmallows as shown in the photo below...
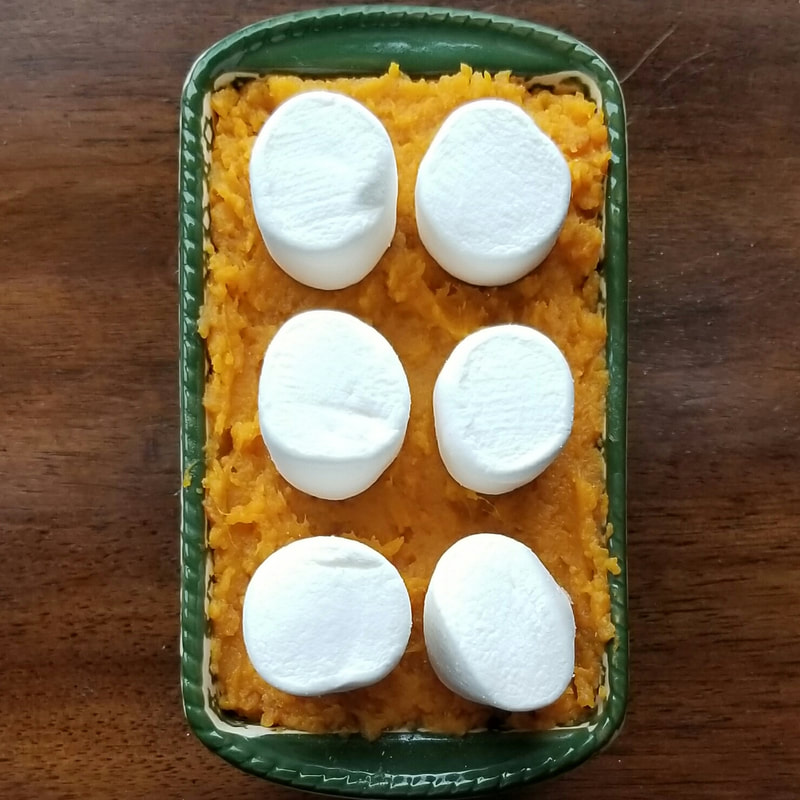
This is where the watching part begins. Set your oven to broil. Once heated, place your dish in the oven, not too close to the top, a notch or so above the middle and close your oven. I use my oven light to watch the tops of the marshmallows brown, but if you must have a time estimate (haha) it took about 4 minutes to brown the marshmallows in the photo below. Oven temps and times can vary and broiling is a very quick process, which is why I suggest watching them and make sure you use oven mitts to remove. This will be a HOT dish!
I like my marshmallows a little more burnt, so I left them in for a minute and a half longer after I took this picture: 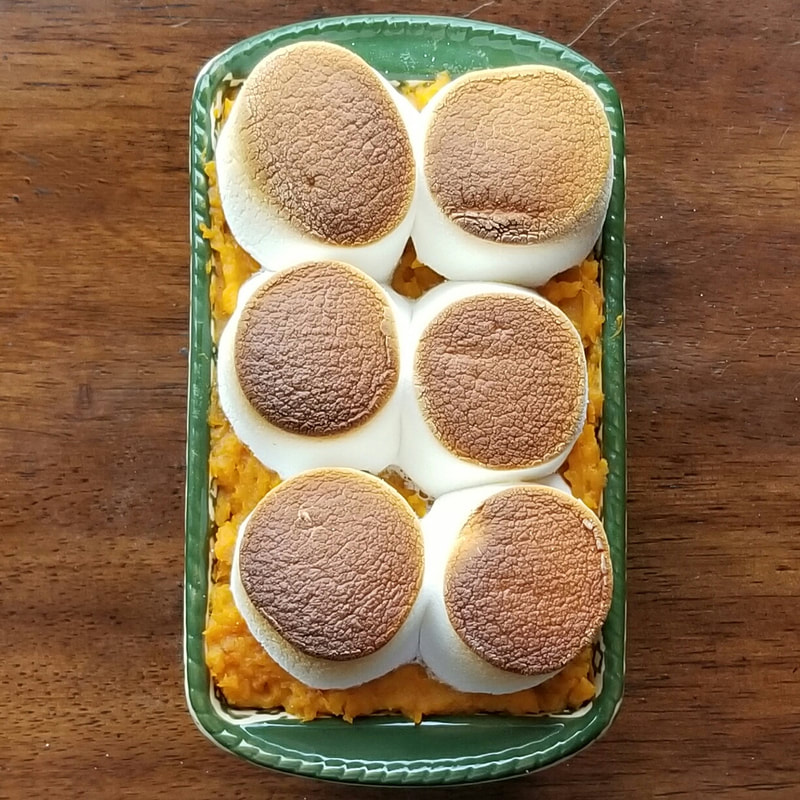
I wanted them to be perfect and pretty just for you! (LOL)
This was my finished product:
If you are meal prepping these, I highly suggest this Wilton 4 cavity loaf pan on Amazon. You can line each cavity with non stick parchment paper and transfer to any to-go dish you may need for work or for snacking at home. Using this Wilton 4 cavity loaf pan, the macronutrients for the servings listed below will remain the same. If you decide to go with a different sized pan, the macros will vary.
Truth be told, this Single Portion Candied Yam recipe is huge so it could actually be split into 2 servings, especially if you don't want it to be your whole meal and you want to prepare it with a yummy chicken or something. I've gone ahead and calculated the nutrition facts for both!
For the entire dish: 534 Calories C/ 80.4g F/ 22.4g P/ 4.3g Half portion: 267 Calories C/ 40.2g F/ 11.2g P/ 2.15g It's no secret that sweet potatoes are nutrition powerhouses packed with one of the best carbs your body can eat and cinnamon has health benefits as well, but if you're looking to shave some calories off this dish, you can omit the marshmallows and save 135 calories, which will knock off -33g in carbs for the full serving and -16.5 for the half portion. 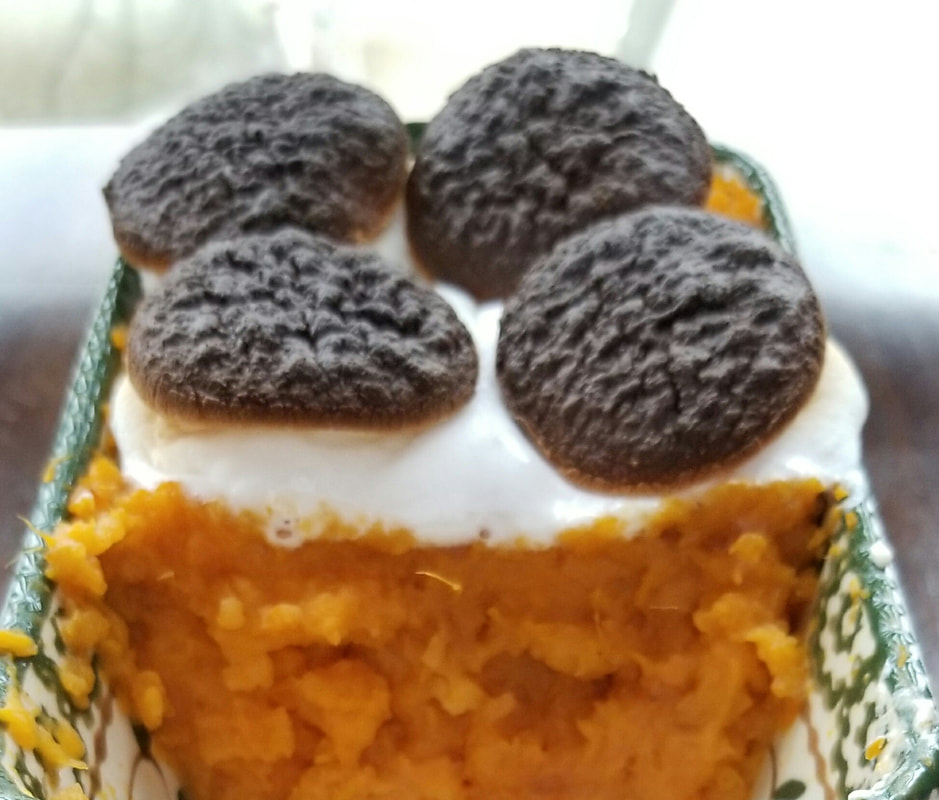
Did you try these Single Portion Candied Yams? Tell me what you thought in the comments below and subscribe to our blog HERE! Don't forget to follow on Instagram!
Full disclosure: We blog about an array of topics from recipes and our favorite products to small business advice and tutorials. We may receive a small commission from links in our posts to keep this blog running, however, we do not represent any companies or products that we do not absolutely love and stand by 110% because that's not how we roll. The opinions expressed are our own. Our blog is for informational purposes only and any information found on this site is not substitute for professional advice. I cook in my spare time, I make fun t-shirt and accessory apparel for children and adults to pay the bills. Check out Liv & Co. and Blue November . Follow on social media: Blue November Facebook Liv & Co. Facebook Blue November Instagram Liv & Co. Instagram Liv & Co. Pinterest Liv & Co. Twitter Subscribe to our YouTube Channel HERE.
0 Comments
 Hey, guys! I bought a bunch of peppers to make stuffed peppers for dinner the other night, but got lazy and didn't, so this morning I got up determined to make some type of stuffed pepper for breakfast. I got online and began searching recipes and they all called for odd ingredients, most of which I didn't have on hand, nor did I want the complexity of. I just wanted something quick and simple to toss in the oven and forget about it (LOL). What makes these stuffed breakfast peppers even better is that they are keto friendly and if you are vegan, simply omit the bacon (though, I'd add some other type of flavor/spice to replace the yummy taste of bacon) from this recipe. These stuffed breakfast peppers are literally the easiest thing to make. They will take you 35 minutes; 5 minutes to prep and 30 minutes to cook. I put pictures of each step below, but let's start with what ingredients you'll need... What you'll need: 1 green pepper (you can use any color, I just used green) 3 strips of bacon (cooked and chopped) 2 large eggs 1/2 cup shredded mild cheddar cheese (approximately) 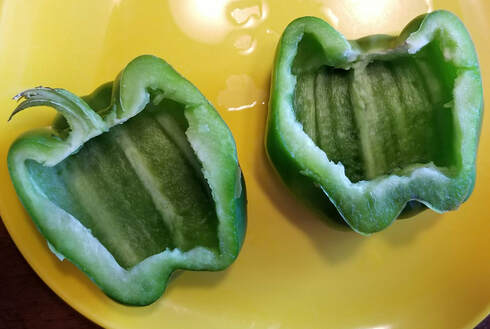 First you're going to pre-heat your oven to 400 degrees and apply a thin layer of oil to the bottom of an oven safe dish. Cut your green pepper lengthwise and remove the seeds and membranes. 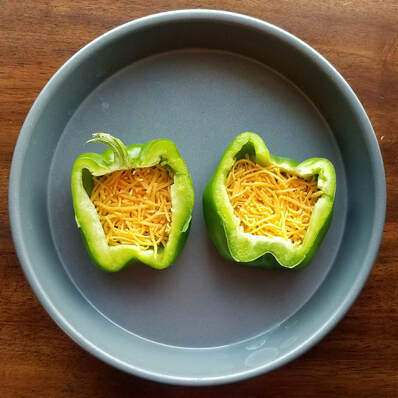 Next, you will sprinkle some shredded mild cheddar cheese in the bottom of your green peppers. 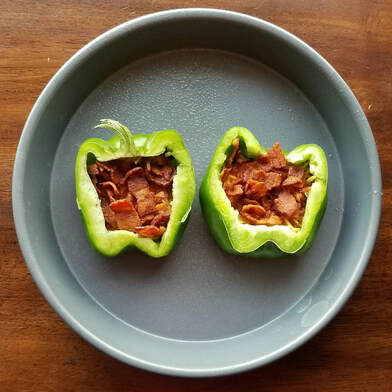 Add a layer of chopped, cooked bacon over the cheese, making sure to leave enough room for the egg in the next step. (Set aside a sprinkle of bacon to garnish the top once the stuffed peppers are through cooking.) 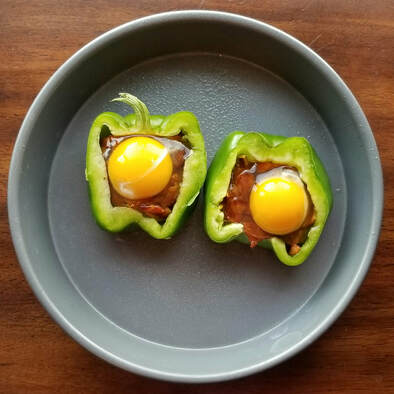 Crack a large egg, carefully as to not break the yolk, and pour it right on top of your bacon layer. 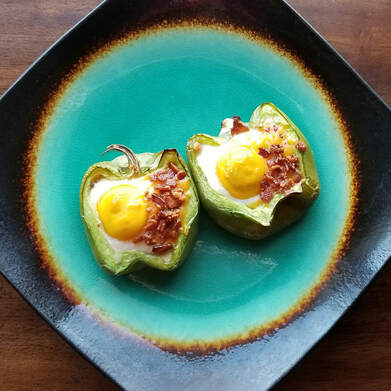 Place your stuffed peppers in the oven on 400 degrees for 30 minutes or until egg looks fully cooked. Sprinkle leftover bacon bits and shredded cheddar on the top to garnish and serve! Did you try these amazing bacon, egg, and cheese stuffed breakfast peppers? Tell me what you thought in the comments below and subscribe to our blog HERE! Full disclosure: We blog about an array of topics from recipes and our favorite products to small business advice and tutorials. We may receive a small commission from links in our posts to keep this blog running, however, we do not represent any companies or products that we do not absolutely love and stand by 110% because that's not how we roll. The opinions expressed are our own. Our blog is for informational purposes only and any information found on this site is not substitute for professional advice. I cook in my spare time, I make fun t-shirt and accessory apparel for children and adults to pay the bills. Check out Liv & Co. and Blue November . Follow on social media: Blue November Facebook Liv & Co. Facebook Blue November Instagram Liv & Co. Instagram Liv & Co. Pinterest Liv & Co. Twitter 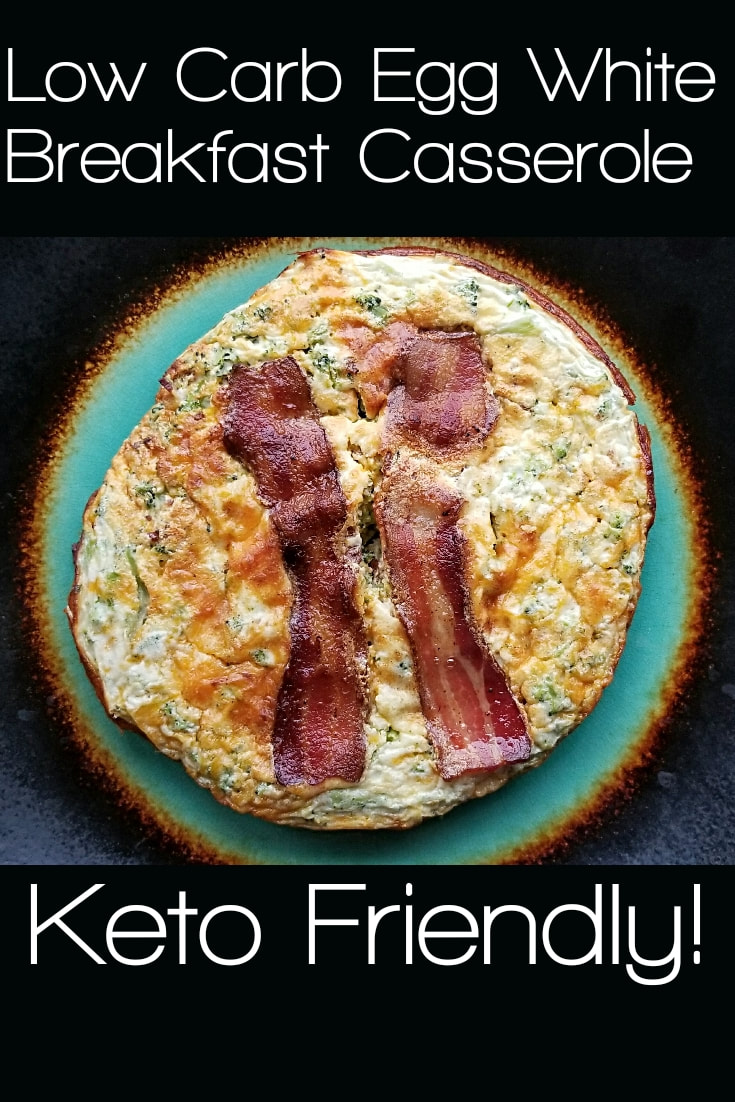 If you are struggling to stay on the Keto diet or any other healthy diet, for that matter, struggle no more. Bake up this easy peasy, extremely tasty, low carb egg white breakfast casserole, throw it in the fridge, and chow down on a slice a day for the week! With recipes like this, there is no reason to fall of the wagon. How can it get any better than bacon, eggs, and sour cream? It can't. Egg White Breakfast Casserole Ingredients: •9 oz. (18 tbsp. egg whites). (I use AllWhites.) •8 oz. sour cream. ( I use Daisy brand.) •6 oz. shredded cheddar cheese. (I use Kraft brand.) •1/4 lb. (6-7 slices) bacon, cooked & all but 2 pieces crumbled. •1/2 cup broccoli, cooked & chopped. I love to chop mine with my handy, dandy Pampered Chef Food Chopper.) •1/2 tspn. salt. •1/2 tspn. pepper. -Grease an 8x8 round or square pan. -Preheat oven 350° -Blend eggs, sour cream, salt, & pepper. -Layer 1/2 the cheese, then the crumbled bacon, then broccoli, then the rest of the shredded cheddar. Top with the remaining 2 pieces of bacon and pour egg + sour cream mixture over top of it all. Bake on 350° for 40 minutes. Total calories per serving (serves 6): 259. C/3 F/20 P/16 Check out the rest of our recipes HERE. Follow on Instagram and Facebook. Feel free to tag us in any recipes you make and/or let us know how yours turned out in the comments below! Hi! My name is Liv. Truth be told, fitness and nutrition is just my hobby (lifestyle). In real life, I design and manufacture clothing and accessories. Feel free to check our our Blue November women's line HERE and Liv & Co. children's line HERE. Blue November: Liv & Co.: 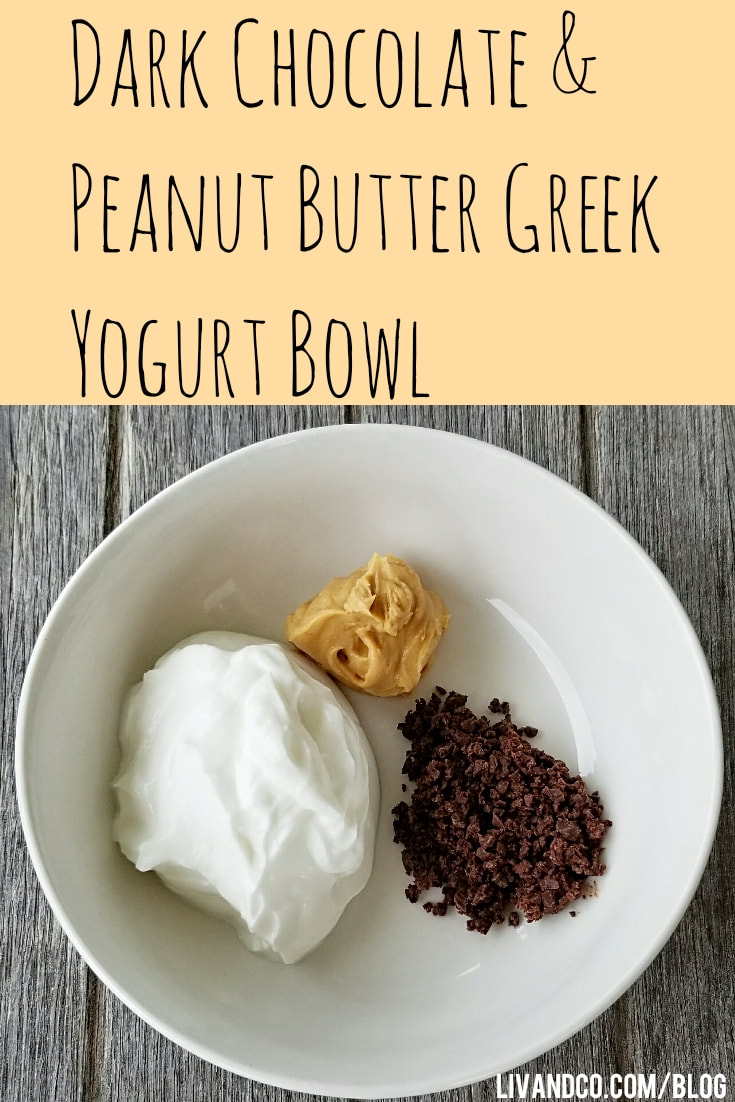 So, so easy. If you failed at your meal planning for the day, have no fear. This protein packed yogurt bowl is here to save the day! The secret to this bowl is PB2. All the peanut butter without the calories and fat! I'm constantly looking for ways to make greek yogurt taste good without buying the blends that are packed with artificial flavors and added sugars. This recipe does just that. All too often I find myself stuck in the kitchen, wasting money on countless online recipes that promise to taste good AND be healthy and turn out disappointed time and again. Not this time. Not in my kitchen, and not on my blog! I spend hours perfecting recipes and I won't post anything that I don't personally find to be flavorful and downright amazing. I'm obsessed with peanut butter. Anyone else have this problem? The craving usually attacks at night when I have zero self control. Seriously, peanut butter can put on the pounds with a quickness if you aren't careful, which is why PB2 is a flipp'in game changer. This is just 3 simple ingredients. Mix them together and you have lunch or a snack in under 5 minutes! Ingredients: -1/3 cup all natural, nonfat, Fage greek yogurt. -1 tbspn. Nestle Toll House dark chocolate morsels, crushed. (I like to use my Pampered Chef Food Chopper.) -2 tbspn. PB2 mixed well with 1 tbspn. water. Stir ingredients together & mix well. Enjoy! P.S. You can also sprinkle some chia seeds on this mixture for added nutrition. Check out the rest of our recipes HERE. Follow on Instagram and Facebook. Feel free to tag us in any recipes you make and/or let us know how yours turned out in the comments below! Hi! My name is Liv. Truth be told, fitness and nutrition is just my hobby (lifestyle). In real life, I design and manufacture clothing and accessories. Feel free to check our our Blue November women's line HERE and Liv & Co. children's line HERE. Liv & Co.: Blue November: 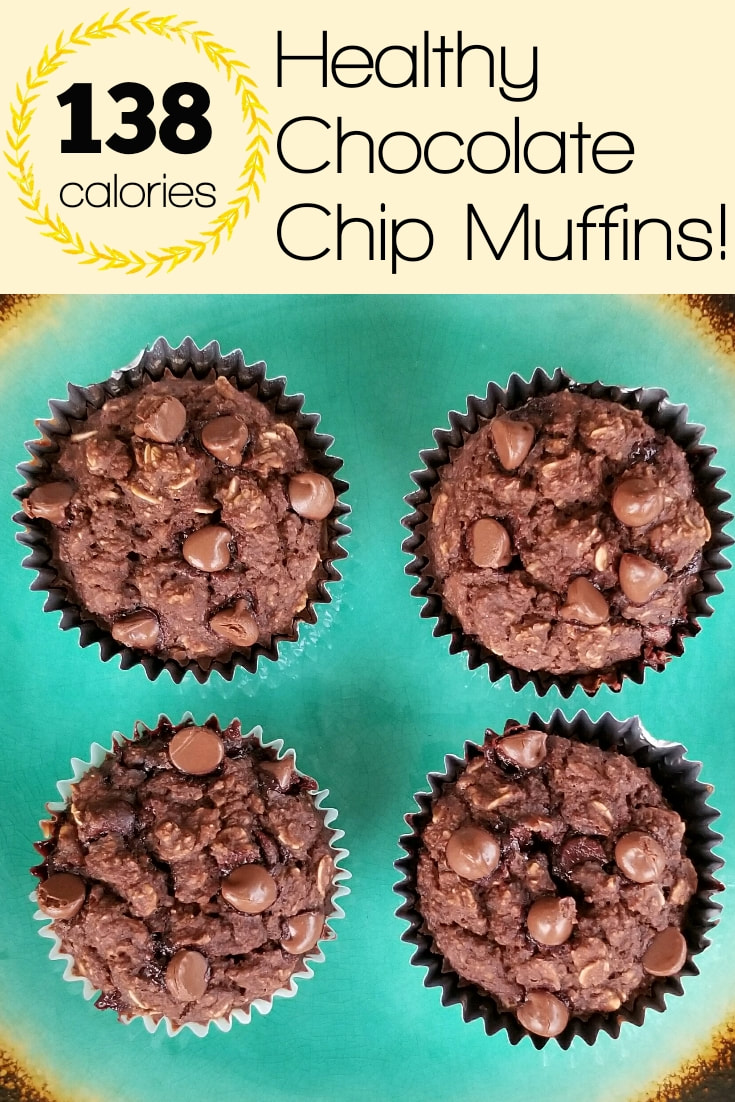 The perfect treat for your high carb days! Healthy Chocolate Chip Muffins • 2.5 cups oats, divided (1.5 + 1). • 2 eggs. • 3/4 cup milk. • 2 tspn. vanilla extract. • 1 cup all natural, unsweetened applesauce. • 2 tspn. baking powder. • 4 tbsp. unsweetened cocoa powder. • 1/2 tspn. salt. • 1 cup dark chocolate chips, divided (1/2 + 1/2). Directions: -Preheat oven to 350°. -Grind 1.5 cups oats up in a food processor until they look like a flour consistency. -Lightly beat eggs. -Mix milk, vanilla, eggs, applesauce, baking powder, salt, & cocoa powder in with oat flour and blend together. -Pour batter mixture into a large bowl. -Stir 1/2 cup of dark chocolate morsels and remaining 1 cup oats (that weren't ground up) into the batter. -Spray muffin liners with cooking spray to keep from sticking. -Divide mixture evenly among 12 muffin liners. - Sprinkle remaining chocolate morsels evenly atop muffins. Bake for 30-35 minutes. Freeze and reheat when desired. These will keep in a freezer for up to 2 months! Carbs: 19 Fat: 7 Protein: 3 Total Calories: 138 Check out the rest of our recipes HERE. Follow on Instagram and Facebook. Feel free to tag us in any recipes you make and/or let us know how yours turned out in the comments below! Hi! My name is Liv. Truth be told, fitness and nutrition is just my hobby (lifestyle). In real life, I design and manufacture clothing and accessories. Feel free to check our our Blue November women's line HERE and Liv & Co. children's line HERE. Blue November: Liv & Co.: 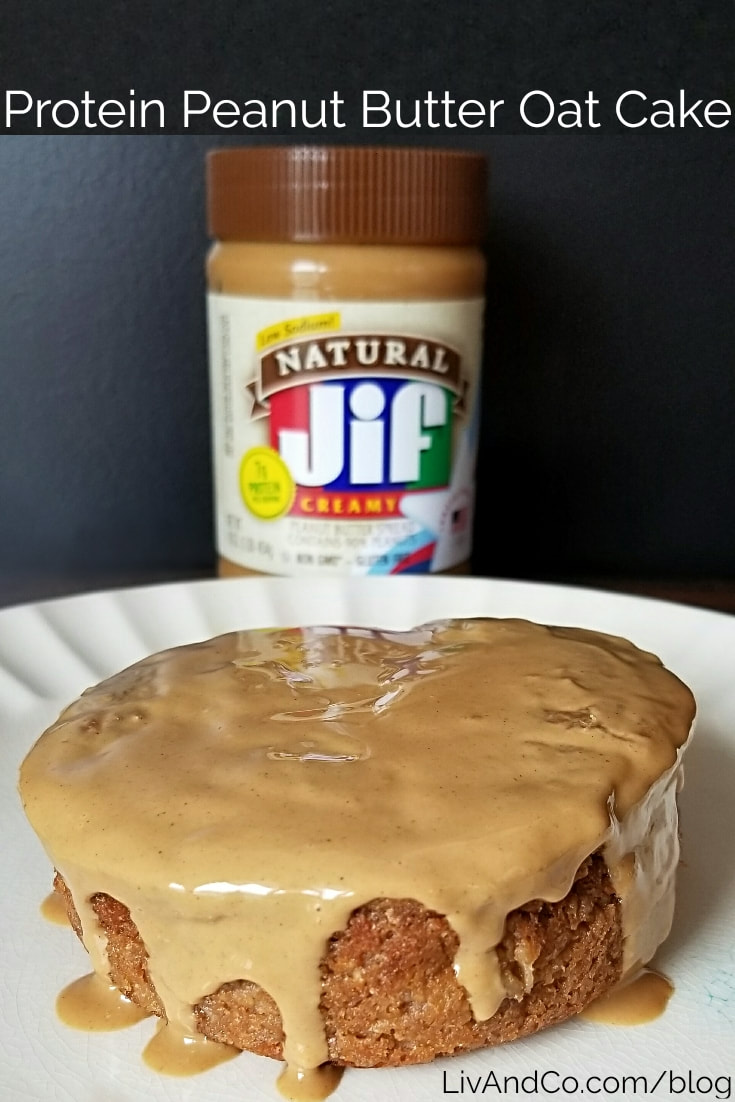 You guys... it was literally like eating cake for breakfast. This sucker was delish. Get ready to take your peanut butter obsession to a whole other level. Ingredients 👇 ✅1 banana. ✅1 scoop chocolate Designer Whey protein powder . ✅1 tsp. baking powder. ✅1 tsp. vanilla. ✅1 cup milk (your choice). ✅1 cup Quaker gluten free oats. ✅6 tbsp. Jif brand all natural peanut butter, divided. (4 for the mixture, 2 for the spread). ☆THIS SERVES 4 (I originally made it for 2 of us and we could only finish half 🤣)☆ Baking instructions: Melt 6 tbsp. peanut butter before preparing. Once the peanut butter is almost melted, start preparing the rest of the ingredients in a large bowl. Make sure the banana is mashed well. Stir in melted peanut butter. Pour mixture into 4 heavily greased baking dishes (if you want individual servings) or an 8x8 baking pan and bake on 400° for 25 minutes. You can also melt the peanut butter you're using for the spread, but I just put 1/2 a tbsp. on top of each for the spread and it melted from the heat of being baked and was easy to spread within 1-2 minutes. YUM. 👍Total calories per serving: 308 Macros per serving: C/32 F/15 P/15. Follow us on Instagram and Facebook. If you decide to try it, come back and tell me what you think about it in the comments below! Edit: I came back to let you know that you can sub unsweetened all natural applesauce in place of the banana if you don't want the banana taste! You're welcome! P.S. Did you know we make shirts and other fun accessories for the family? Now you do! If you want to shop our handmade, unique line of women's apparel and accessories, head to Blue November HERE. If you'd like to shop our family apparel oriented apparel for babies, toddlers, and mamas, head HERE. 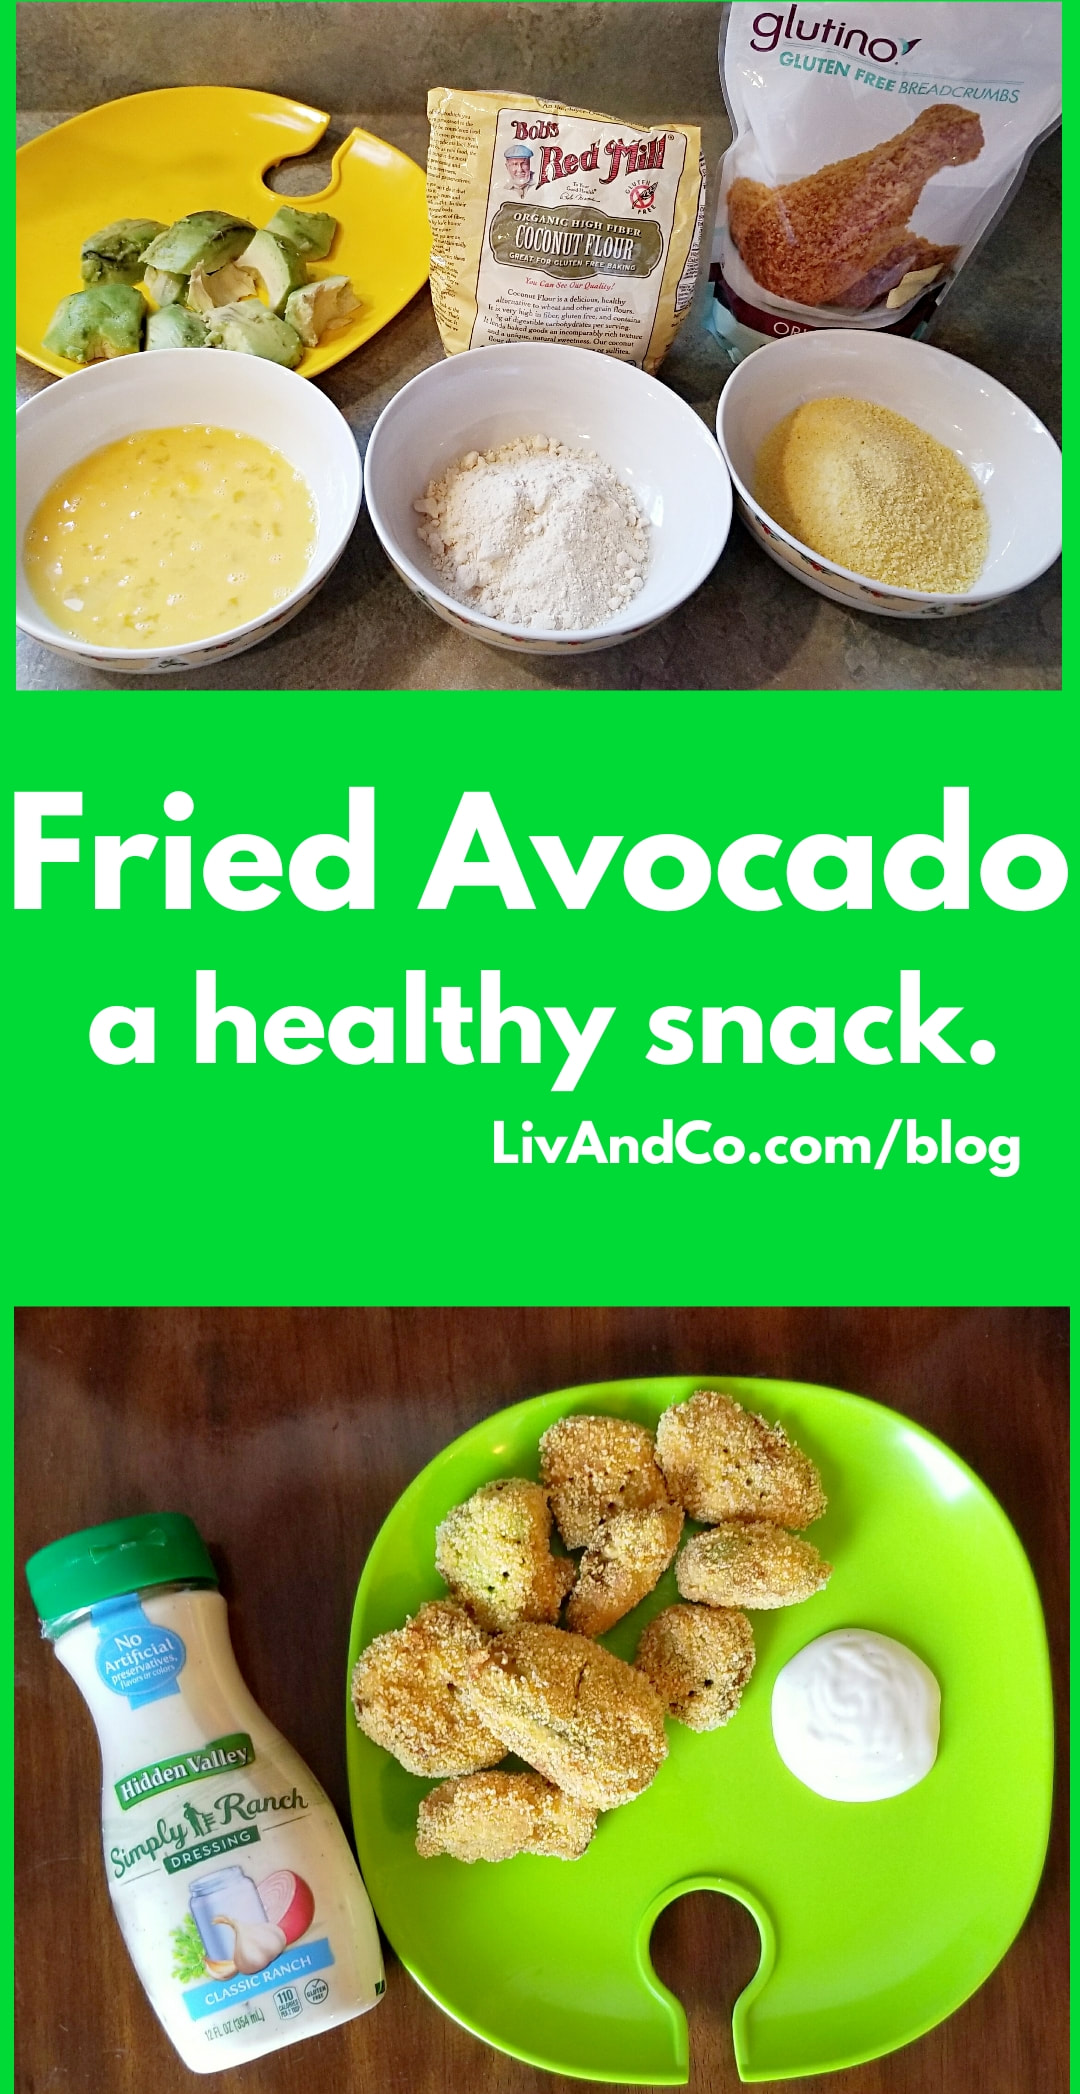 First, let me tell you that these fried avocados are amazeballs. I'm not one of those lengthy bloggers, I'm going to give it to you straight; short & sweet. I don't measure the ingredients, I eye it up, but you can't really get it wrong because you just add more to each bowl if you're running out. What you need: •3 bowls •1 ripe avocado (soft & dark) •1/2 cup gluten free bread crumbs (approx.). I used Glutino. •1/2 cup coconut flour (approx.). I used Bob's Red Mill Organic. •2 eggs. •If you don't have a fryer, you'll need a medium sized pan filled halfway with olive oil. 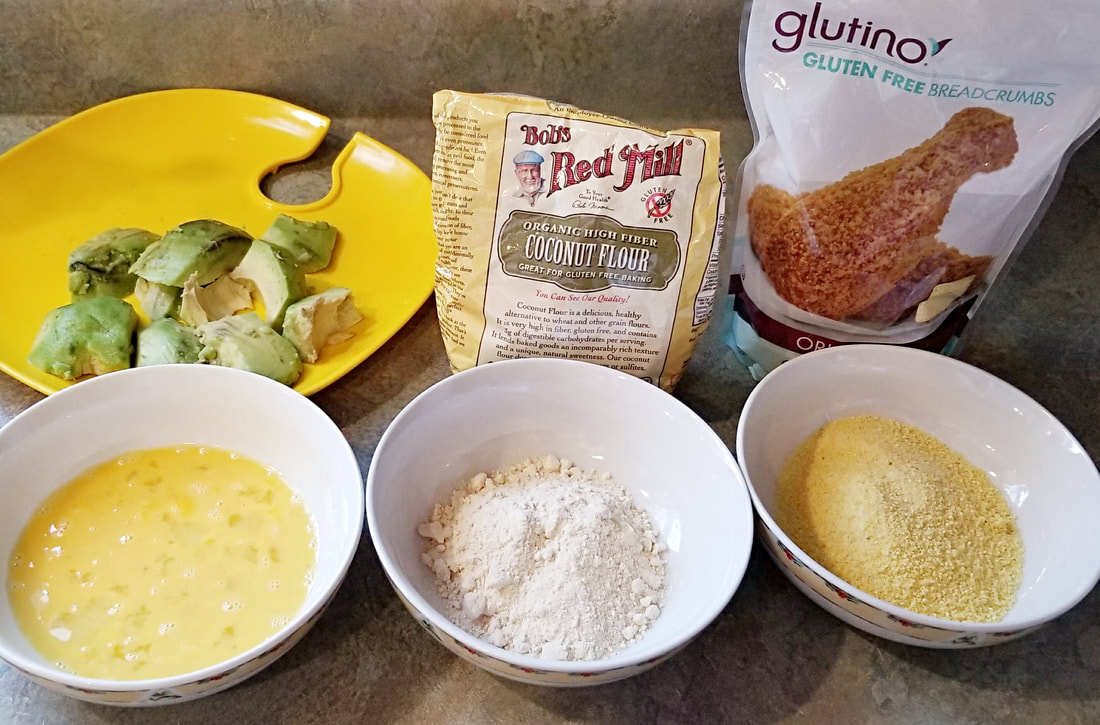 Instructions: -Beat the eggs thoroughly. -Peel your avocado. Skin it? Peel it?... You know what I mean. -Slice your avocado into big chunks. -Turn stove on low to medium heat. -Place the pan filled with olive oil on top of the burner. -Coat your avocado chunks in the flour. -Shake off the excess flour then cover evenly in egg. -Allow the excess egg to fall off in the egg bowl, then transfer mixture to bread crumb bowl. Evenly coat in bread crumbs. -Once they are all coated, add your chunks to your olive oil pan. Fry approximately 2 minutes on each side (until golden) and remove. -Serve with your favorite dipping sauce. I selected Hidden Valley Simply Ranch (no artificial flavors or preservatives), but next time I'm going to try my healthy Southwest Fiesta Ranch Dip. 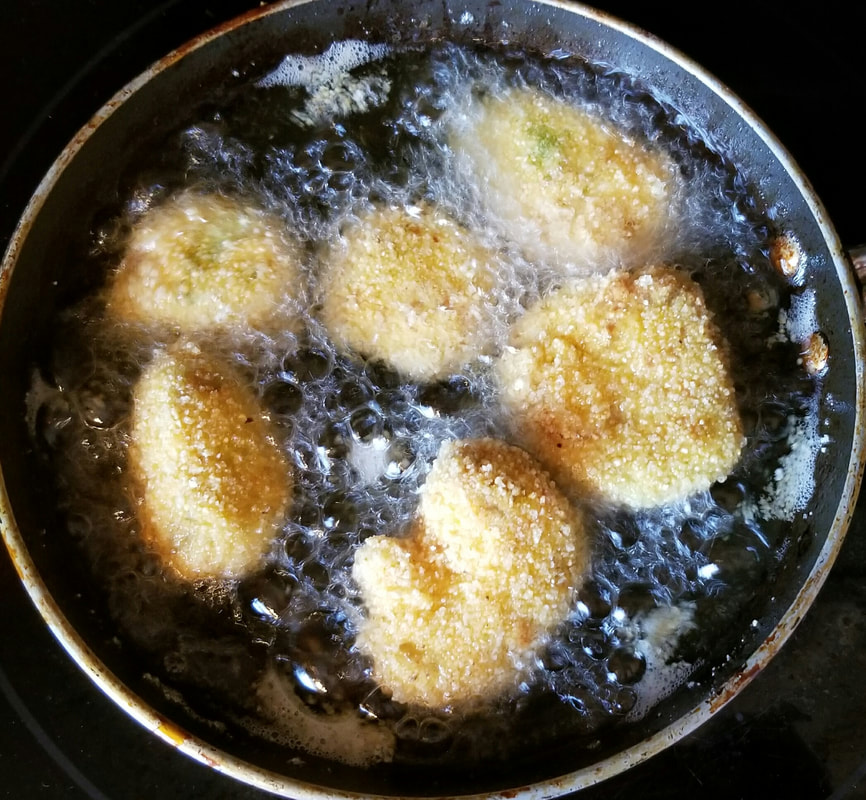 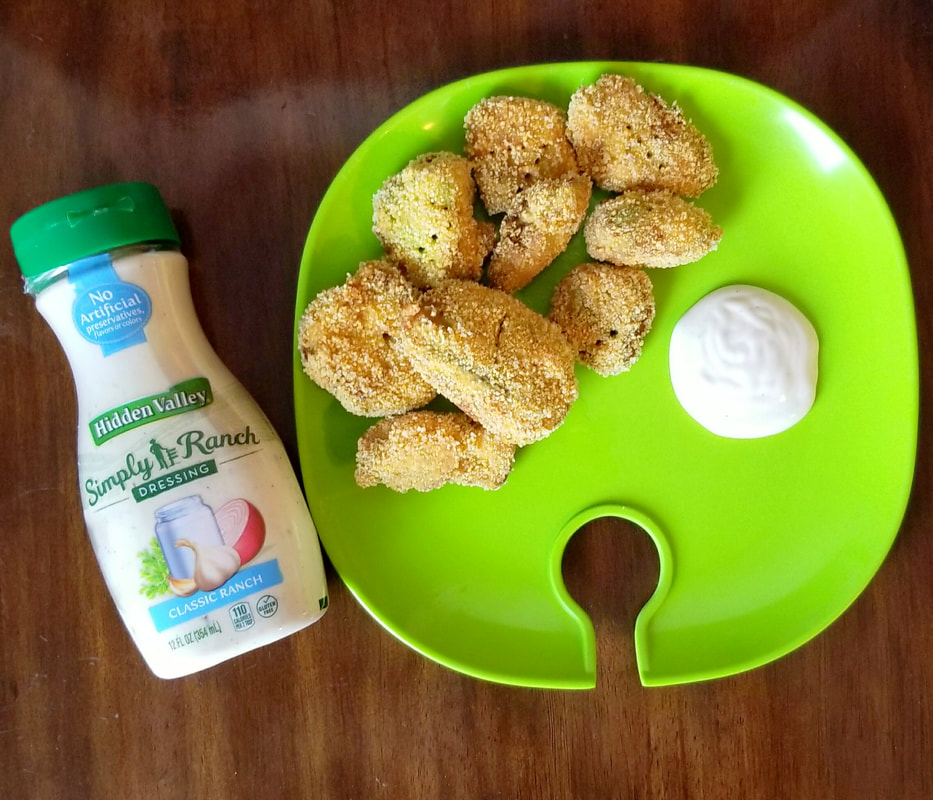 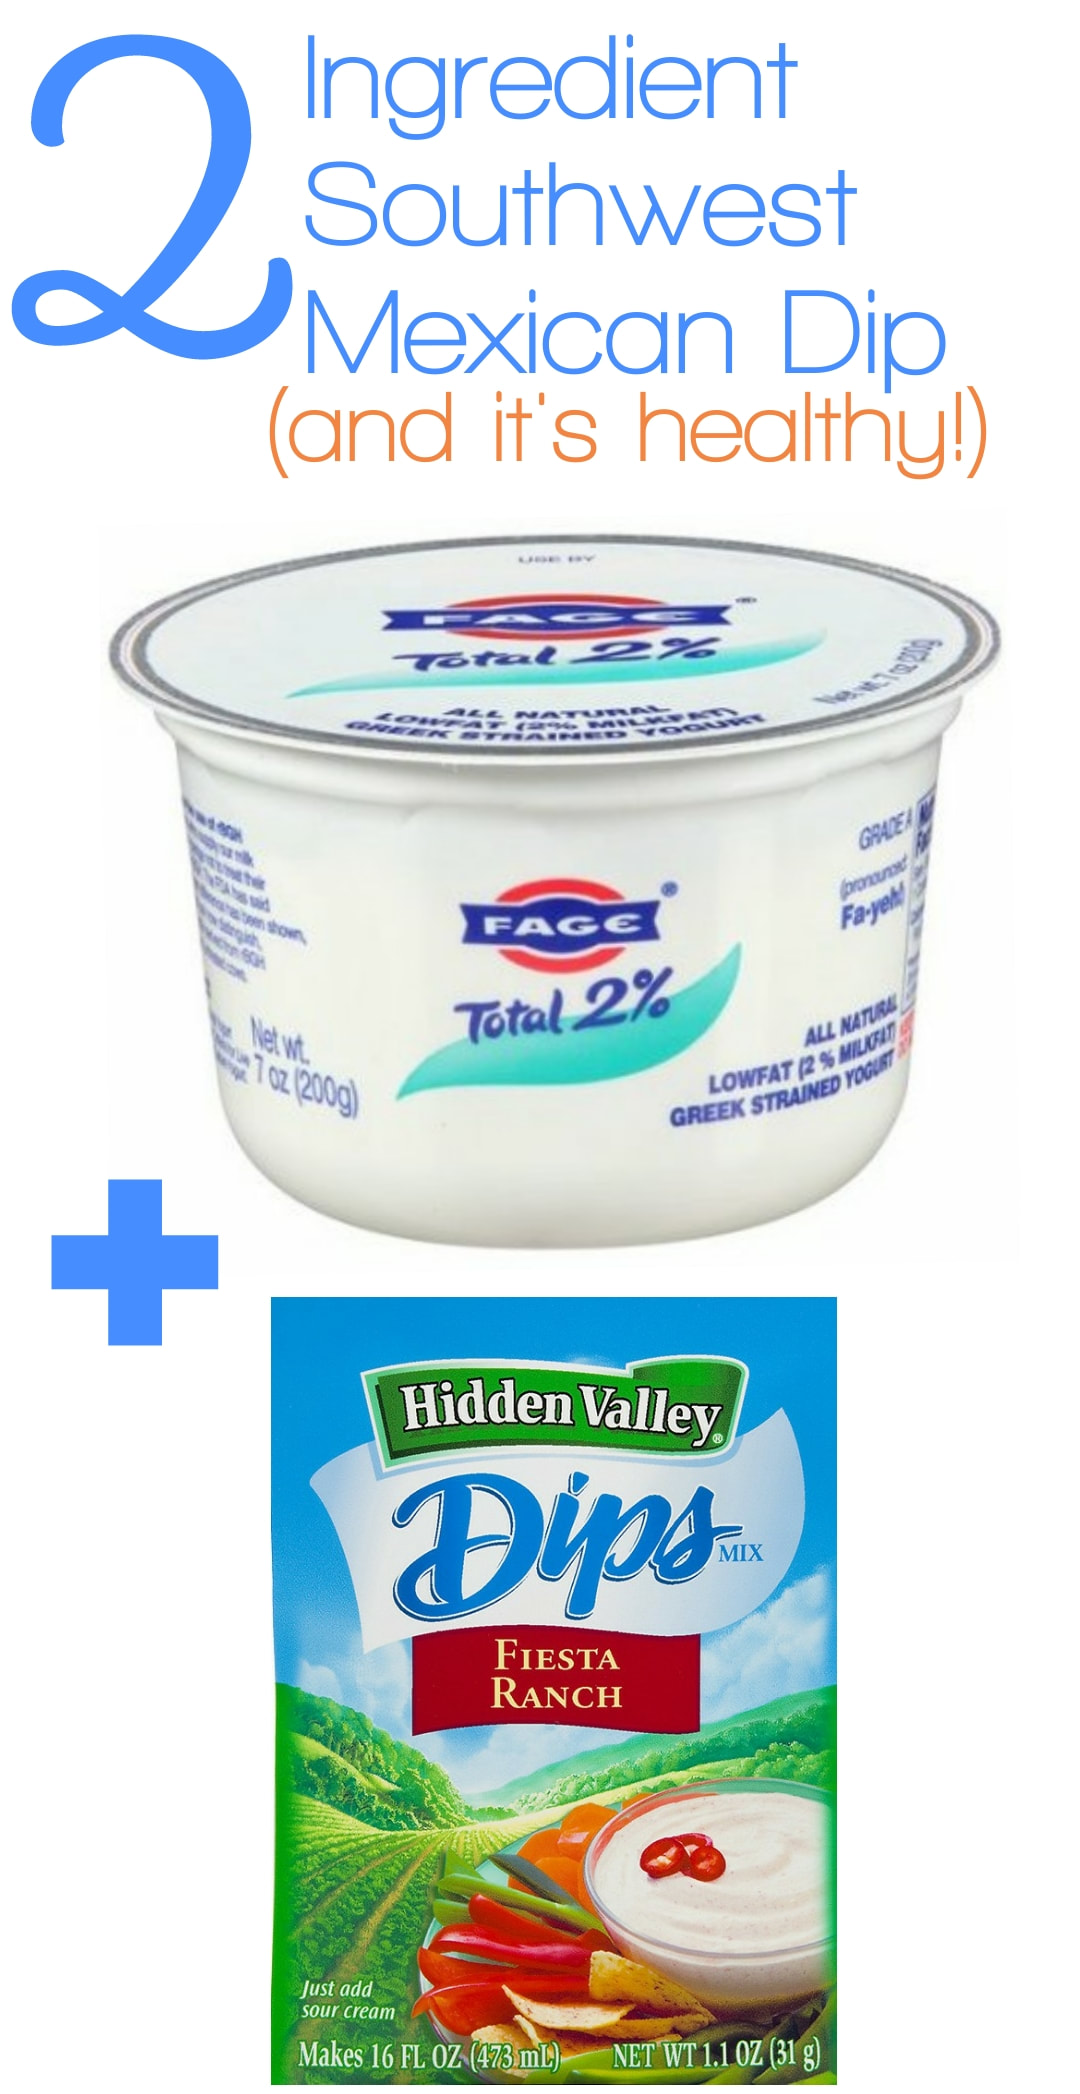 I don't know about you, but I have wasted SO much money and so many ingredients on these healthy, macro friendly, protein recipes on line that end up tasting like total crap. I make a protein cake. It sucks. (Edited to add: I concocted my own protein cake recipes and you can find them HERE in my recipes section! Yay!) I make banana protein pancakes. They suck. It's funny because all of these YouTuber's will swear they have THE BEST recipes, but I'll follow them to a T and they still turn out nasty. So I'm over at my friends house doing a photo shoot for Liv & Co. and she offers me this dip and carrots. 2 ingredients. Only 2 freaking ingredients. Who knew?! 1 17.6 oz. tub of greek yogurt (2%- I like Fage brand) mixed with 1 packet of Hidden Valley Fiesta Ranch Dips Mix. If you're anything like me, you're probably thinking, "plain greek yogurt? Ewe..". Ya, I thought that, too. The taste of greek yogurt is SO overpowering that it normally overtakes anything you try to mix it with, but not this dip! We initially used Grimway Farms carrot chips (but any carrot will do) to dip it in (so super healthy), but then we bought some raddish chips, then tried it with broccoli florets, and even Tostitos® SCOOPS!®. If you've ever spent hours slaving away on layered Mexican dips, or spent heaps of money on veggie trays, this will take you 5 minutes to stir up and tastes just as good, if not better, and it's healthy. You can eat the crap out of these guilt free! The dip alone has 23g of protein per serving, not to mention the probiotics and overabundance of health benefits carrots and other veggies have to offer. Now, I always have a tub of this Southwest Dip in my refrigerator to nibble on throughout the day. What an excellent snack to take to work. I even took this to a party recently and made a friend try it before I told her what was in it, and she swore it was sour cream based. Nope! Have you ever had this dip? Did you love it? Tell us in the comments below! My name is Liv. I actually make baby clothing and accessories and own Liv & Co. On the side I dabble in photography and love to blog my recipes, workouts, small business tips, children's fashion, arts and crafts, and I also review products. Check out the rest of my blog HERE. If you're a mom that loves to shop small, handmade businesses, visit my shop HERE. If you'd like to advertise with Liv & Co. head HERE. 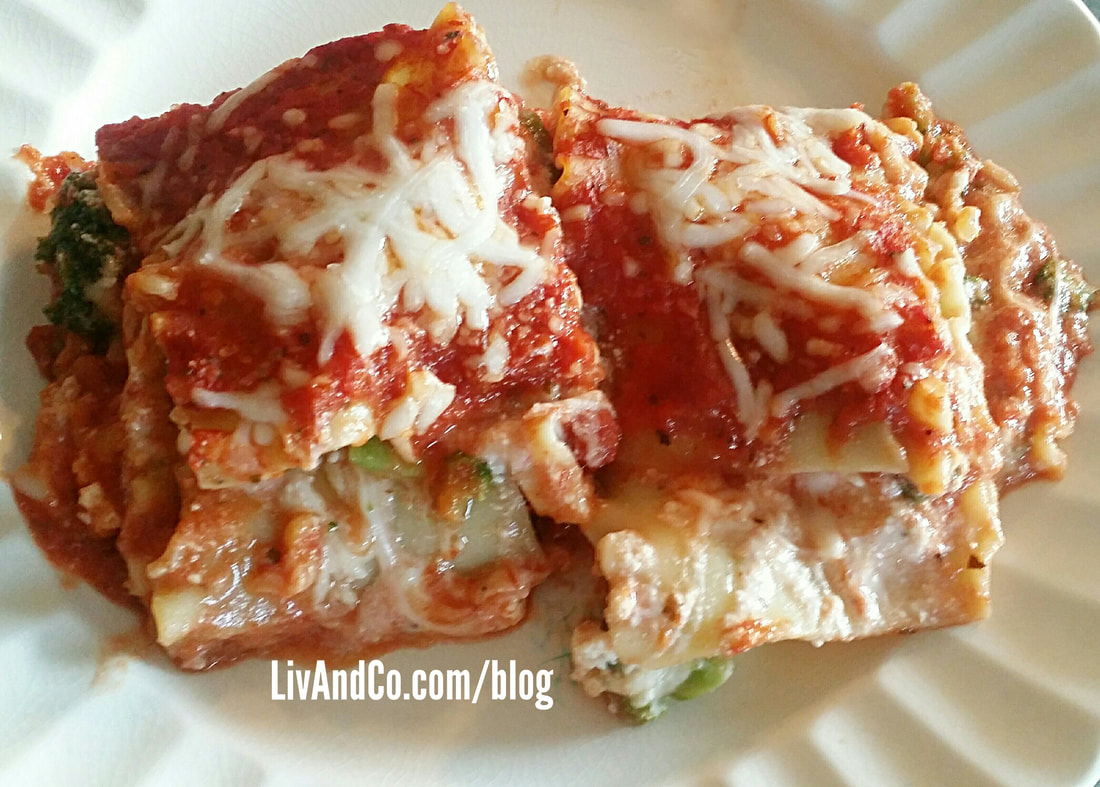 I try to be as healthy as possible at all times. This recipe isn't exactly that, but it's the perfect way to pack lots of veggies into your kiddo's without them really noticing. So, if you've hopped off the meat eating train for a bit, but still don't mind dairy, this veggie lasagna recipe I've concocted is going to rock your world. You might be thinking, "Ewe!", because honestly, at first, I did too, but then I made it, I ate it, and I'm never turning back. I've been subbing vegetables everywhere that I would normally put meat, and come to find out, everything still tastes almost exactly the same, so meat isn't all it's cracked up to be as far as making the flavor of a dish. I get anxiety making lasagna in big dishes because I know it will go to waste and I hate throwing food away, so this portion size is perfect to feed a family of 4-5 for one evening (we actually fed 6-7 people with it) and still have leftovers for lunch the next day. If you'd like to make this dish in a standard 13x9 pan, just double the recipe. 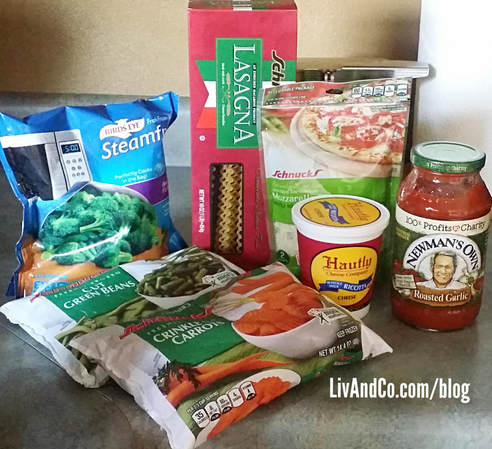 What you'll need: -8x8 pan -7 strips of lasagna noodles (if you can find whole grain or whole wheat noodles, you'll make this lasagna healthier.) -1 handful frozen broccoli -1 handful frozen green beans -1 handful frozen, crinkle cut carrots (or sliced carrots) -1 15 oz. ricotta cheese (you'll use about half) -1 8 oz. bag of mozzarella cheese -1 24 oz. jar of marinara sauce (I use Newman's Own because they are an ethical company & donate 100% of their profits to charity). (You can use whatever vegetables you want. When my kids won't be sharing with me, I'm going to try some green pepper and onion next time.) Below is what your first layer will look like: 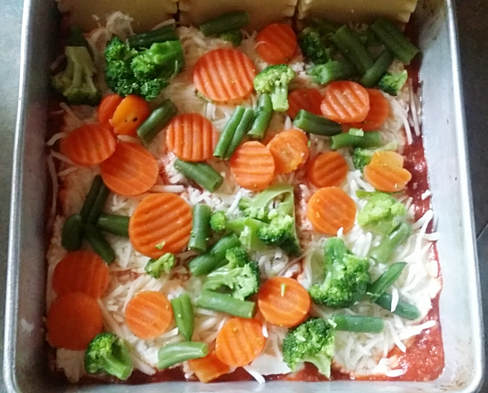 Pre-heat your oven at 375 degrees. Apply a thin layer of marinara to the bottom of an 8X8 pan so noodles don't stick. Boil your noodles for about 10-12 minutes (add salt or oil to prevent sticking). Stir occasionally. While your noodles are boiling, put all your veggies in a pot & steam them. (I use frozen vegetables because they preserve nutrients). This takes place of the time you'd normally prep meat for a meat lasagna. Once noodles are done, drain them. Let them cool enough to touch and layer 3 rows of noodles in your pan. One end of your noodles will lap over your pan - don't cut them off. Let them hang over. Apply a layer of ricotta over top of the noodles, then a layer of shredded mozzarella, then a layer of your steamed veggies. Apply another layer of noodles over top of your veggies, but let the noodle ends drape off the opposite side of your pan than the bottom layer, then repeat layering your marinara, ricotta, mozzarella, and veggies. Fold over your noodles that lapped and apply your 7th noodle straight down the middle that is uncovered and apply a generous layer of marinara and mozzarella cheese. Bake on 375 degrees for 30-35 minutes. Make sure your cheese is fully melted. Let stand for 5 minutes & serve. Your final product will look like this:  Have you tried this recipe? Tell us what you thought of it in the comments below! Find more recipes HERE.
|
Categories
All
AuthorProud Mom of 3 beautiful children. Creator, investor, designer, & owner of The Marketplace by Liv & Co., High Tidy, High Tide R & R, The Matriarchy Matters, Hitched, Liv & Co. Photography, Selfies By The Sea and the Everything Panama City Beach, FL Facebook group. 
Archives
February 2024
|


 RSS Feed